Sunday, December 1, 2013

Pie Crust

This is from the recipe drawer of Minnie.  As we move into the holiday season, many of us do more baking that in the other parts of the year.  I found this recipe that belonged to my grandmother and it makes 5 pie crusts at once.  You can make a pie or two and put the other crusts in the freezer and they will be ready for you the next time you need to make a pie.


  • 4 cup flour
  • 1 3/4 cup shorteen (shortening)
  • 1 table (tablespoon) sugar
  • 2 teas (teaspoons) salt
  • 1 tabspoon (tablespoon) vinegar
  • 1 egg
  • 1/2 cup water
*With fork mix flour shorteen salt & sugar in small bowl
*Beat water egg & vinegar
*Add to first mixture
*Blean (Blend) with fork until dry ingreadints (ingredients) is moistened
*Dough can be storyed (stored) in refrigerator up to 3 days are (or) in frozen until ready to use

As you can tell, my grandma wrote the way she talked.  It has been fun to look at and "interpret" this recipe.  Of course, this recipe assumes that you know how to separate and roll out the dough.  This is the recipe that my mom used as I grew up and once you have divided the dough into 5, use the ones that you want and then wrap each of the others in some plastic wrap and then store in a zip bag in the freezer.  It doesn't take long for it thaw out the next time you are ready to make a pie.

Sunday, November 10, 2013

Buttermilk Rolls

This is from the recipe drawer of Pauline.  On a recent visit to my sister's house, she pulled out a lot of recipes and cookbooks that she had up on her shelf.  Knowing that I had been looking at old recipes, she said that she had several things that belonged to both of our grandmas.

We found this recipe on the inside front cover of a cookbook.  As you can tell from the picture, it was a well-used recipe; lots of spatters and stains.  I always find that my most used and beloved recipes look like this.

This recipe intrigued me, because I have never heard of a hot roll recipe that called for buttermilk.

1 cup lukewarm buttermilk
1 cake yeast (soak or dissolve in warm milk) (a "cake" of yeast is the same as an envelope)
1 tsp sugar
1 tsp salt
1/4 tsp soda (baking soda)
3 Tblsp shortening
Flour enough to make a soft dough, like biscuit dough

*Cream shortening with salt, sugar & soda, then add flour, alternating with milk & yeast (flour approximately 2 1/2 to 2 3/4 cups)
*Let this dough rest 30 min., covered
*Then make into rolls or cut with biscuit cutter
*Place in greased pans, let rise until doubled in bulk
*Bake in 450 degree oven for 12 to 14 min.
Do not have milk too warm for yeast - just lukewarm

I really do want to try this recipe.  It intrigues me also because I know that my grandma used to work at the school cafeteria...You don't think this might be a recipe for those famous, awesome, school cafeteria rolls, do you??

Friday, October 25, 2013

Raw Apple Cake

This is from the recipe drawer of Pat.  I'm not sure where my mom got this recipe originally, but she used to make it often.  It was the favorite cake of my dad's best friend, Bill.  My dad and and Bill were truck drivers and often hauled apples.  We usually had several bags of chopped frozen apples in our freezer from their trips to the northwest.

Bill, became my father-in-law and like father, like son.  This is my husband's favorite cake as well, so it was important for me to have this recipe.  I don't have this recipe written in my mom's handwriting, but here it is:

3 c. flour
2 c. sugar
1 t. baking soda
1/2 t. salt
1 t. cinnamon
3 c. apples; peeled, cored and chopped
1 1/2 c. chopped nuts, (optional)
3 eggs, slightly beaten
1 1/4 c. vegetable oil
2 T. vanilla

*Mix dry ingredients
*Add apples; and nuts (optional)
*In a separate small bowl, combine oil, eggs & vanilla
*Add to main mixture
*Stir with spoon or spatula; do not use mixer
*Grease and flour a tube pan or a 13 x 9 baking dish
*Bake at 350 degrees; tube pan - 1 hour; 13 x 9 - 45 min

There is a secret to making this the awesome cake that it can be.  You have to hide it.  Oh... it is good if you eat it the same day that you bake it.  But make it a day ahead and once it is completely cooled, put a lid on your pan if it has one, or cover it with plastic wrap.  Hide it!  If someone knows you have the cake, they might sneak a bite.  If you can manage to keep it until the next day, you will taste the most amazingly moist cake.  Just before you serve it dust lightly with powdered sugar.

Tuesday, October 8, 2013

Banana Nut Bread

This is from the recipe drawer of Minnie.  You know that I love quick breads of all kinds...pumpkin bread, zucchini bread, and especially banana bread!  There are so many different recipes circulating around for banana bread and so many of them are good...

1/2 cup sugar
1/2 cup shortening
2 cup ripe banana
3 tablespoon milk
1/2 teas salt
1/2 cup chopped nuts
1 egg
2 cup flour
1 teas soda

Mix well
Put in greased loaf pan
Bake 350 - 45 min

As a banana bread aficionado, I think I had better give this one a try.

Sunday, September 29, 2013

"Sock It To Me" Cake

This is from the recipe drawer of Pat.  This is a cake that my mom used to make on special occasions. It is an interesting recipe, as this was one of the first cakes I remember her making in a bundt pan.  It also doesn't have a traditional frosting, but instead has a glaze.

Combine:
1 Box Duncan Hinds Butter Cake Mix
1/2 cup sugar
3/4 cup oil
4 eggs, well beaten
1/2 teaspoon butter flavoring
1 teaspoon vanilla
1 cup nuts
1/2 pt. sour cream

Mix together:
     1 tablespoon brown sugar
     1 teaspoon cinnamon
Pour half of batter in pan.  Sprinkle half of sugar mixture over batter.  Pour other half and sprinkle rest of mixture.  Bake 325 for 1 hour.
While cake is warm glaze with:
     1 cup powdered sugar
     3 tablespoon milk
     1/2 teaspoon vanilla
     1/2 teaspoon butter flavoring

Now that I really look at this recipe, I don't know if I ever remember seeing a "butter" cake recipe or "butter" flavoring.  Guess that is something that I am going to have to look for the next time I am at the store.  Curious if they still have those.

Next time you need a cake for company or to take to a pot luck, give this one a try.

Friday, September 13, 2013

Mexican Cornbread

This is from the recipe drawer of Maxine.  Cornbread is such a classic.  No southern lady would be without her go to recipe.  But there is always that occasion when you need something a little special or maybe with a little kick!  Maxine had this one in her drawer.


1 cup yellow cornmeal
1/2 t. baking soda
3/4 t. salt
2-3 eggs beaten
1 reg. size cream corn
1 cup milk
1 1/2 - 2 jaleppano peppers chopped fine
1/2 cup bacon drippings or oil

Mix & set aside -- Blender is real good

1 1/2 lbs ground beef
1 large onion chopped
1/2 lb graded cheese
1 bell pepper
garlic powder or salt

Brown meat & pepper & 1 t. salt to taste.
Drain on paper towel.
Take 10" skillet & heat on top of stove & sprinkle cornmeal lightly & brown slightly
Pour half of cornbread mixture in skillet & put cheese (grated) over meat mixture then onion & rest of cornbread mixture
Bake 350 degrees - 45 min.

This is a hearty cornbread.  Even though it could be a bread, it is more like a side dish or even a main dish if you are eating light.  I know that there are a couple of misspelled words, but I didn't want to change what is written.  I figured that you all would understand.  The layering instructions are not well written, but my understanding is to put half of the cornbread mixture, then the browned meat/peppers, then the cheese, then the onion and finally the remaining cornbread.

I find the instructions on heating up the skillet (I would assume that this would mean a cast iron skillet) very interesting.  I actually learned this trick when watching my own mother, Pat, make cornbread, and my husband's grandmother, Lola, (Maxine's mother) make biscuits.  Pat would put the shortening called for in the recipe in her iron skillet, stick it in the oven and allow it to melt while the oven and the skillet heated up.  She would then pour the hot, melted shortening into the batter as the last ingredient, stir it in and then pour the cornbread batter into the hot skillet.  This made the cornbread very crisp as it almost "fried" in the skillet.

Lola, on the other hand, left the melted shortening in the skillet and she would place her biscuits into the pan, thus causing the same effect, basically "frying" the biscuits just a little, making them very crispy.

While interpreting a recipe for biscuits that my mom's aunts had written down, belonging to my great-grandmother, Stella, I noticed that there were a few tablespoons of oil.  Since there were no instructions to this recipe, just a list of ingredients, I chose to follow this train of thought.  Heating the oil in a cast iron skillet and basically "dipping" both sides of the biscuits in the hot oil.  My husband really likes these biscuits, with the very crispy outside.  You might give this a try the next time you have some oil or shortening in one of your quick bread recipes.

Wednesday, September 4, 2013

Pizza Loaf

This is from the recipe drawer of Maxine.  Here is a great combo between meatloaf and pizza.  Sounds like it might make a great item to serve at a party.


1 egg
1 10oz can (1 1/4 c.) pizza sauce
1 1/2 t. salt
1/4 t. pepper
3 c. Kellogg's Corn flakes
2 lbs. ground beef
1/4 c. finely chopped onion
1  4 oz can (2/3 cup) mushroom stems & pieces, drained (optional)
1  6 oz pkg. (4 slices) natural mozzarella cheese or cheddar

1. -- Place egg, pizza sauce, salt, pepper & Cornflakes in large mixing bowl; beat until thoroughly combined; add ground beef, onion & mushrooms; mix lightly but thoroughly.  Place half the meat mixture evenly in bottom of ungreased 9 x 9 x 2 inch baking pan; place 2 slices of cheese over meat mixture; place remaining meat mixture evenly over cheese.

2.--Bake in moderate oven (350 F.) about 1 hour or until meat begins to shrink slightly from sides of pan.

3.--Meanwhile, cut remaining cheese into narrow strips; Remove loaf from oven; Lay cheese strips diagonally over top of loaf; Return to oven & bake about 3 min. longer until cheese strips are slightly melted; Cut into squares; serve hot, garnish with parsley & sweet cherry peppers.

Yields 9 servings

Sounds like a gooey, cheesey version of meatloaf, with some pizza flavors, with no crust.  Looks like it would be a great option for those not wanting to do pizza because of the crust.  Think I might give it a try!

Sunday, September 1, 2013

Glue Sniffer's Delight

This is a recipe from the drawer of Maxine.  So....I just thought I had to include this recipe because the name is SO CRAZY!!!!!  I guess this is basically a fermented fruit topping that you would use on ice cream or pound cake or.... you choose.  There are no serving suggestions listed on the recipe.


Use wooden spoon & glass cup.  Use only canned fruit, well drained.
Pineapple tidbits, sliced peaches, cut into 1/2 inch pieces & maraschino cherries, cut in half.
Add 1 c. fruit & 1 c. sugar, wait two days, then stir.
Then stir each day til next addition.
Wait at least 2 weeks between additions.
Always have at least 3 cups mixture left in jar.
Add fruit & sugar on 1st & 15th of each month.
Repeat.
Cherries
Pineapple
Peaches
--in the same order each two weeks or more.

This recipe does leave some interpretation.  First, if you are going to have several cups of fruit and be making additions as you go along, you will need more than a glass cup.  I am thinking a large glass bowl would be better.  Next, I would think that you would want to add a combination of fruit each time, but I guess you could interpret it to mean that you would add 1 c. of a single fruit and a different fruit each time.
Another point left to interpretation is the frequency.  I guess you can add once each two weeks, or you can add twice a month, as both time frames are mentioned in the recipe.  

Just personally this sounds like it would be VERY sweet, if you add a cup of sugar every time you add a cup of fruit.  Also, I see it that you would need to go at least two months before you could use any of it, because it would take you 6 weeks to get 3 cups worth, and it says to always have at least 3 cups of mixture left in the jar.  So on your 8 weeks addition you would have 4 cups worth, so at that time you could use a cup of the mixture.

Anyone adventurous enough to give it a try??

Tuesday, August 27, 2013

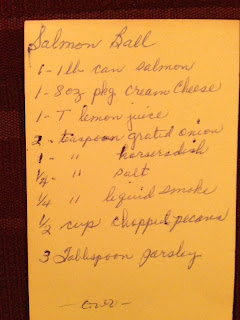
Salmon Ball

This is from the recipe drawer of Maxine.  So as I came across this recipe it made me wonder just how many different ways can you mix up cream cheese with a variety of ingredients to serve in a ball shape with crackers?  It seems that we are pretty obsessed with cream cheese balls...well, I know that I for one love them!!!

1 - 1lb can salmon
1 - 8oz pkg cream cheese
1 - T. lemon juice
2 - teaspoon grated onion
1 - teaspoon horseradish
1/4 - teaspoon salt
1/4 - teaspoon liquid smoke
1/2 cup chopped pecans
3 Tablespoon parsley


Drain & flake salmon; remove any skin or bones
Combine the salmon & cream cheese and all seasoning
Mix thorly (I assume this means "thoroughly")
Combine the pecan & parsley
Shape salmon in ball
Roll in nut mixture
Chill well
Serve with assorted or rye crackers

I must admit...this is a little more sophisticated than most cheese balls I am familiar with.  Maybe I'll try it for the next game and see if I can "up" the sophistication just a little bit.

Saturday, August 24, 2013

Sugar Jumbles

This is from the recipe drawer of Maxine.  I came across this recipe and have to admit that I am confused.  The ingredients make it look like a cookie recipe, but the amounts are quite small and so I am not sure that it will make cookies.

1/2 c. shortening
1/2 c. sugar

Mix
Add:  1 egg
Add:  1 teaspoon vanilla (from reading Maxine's recipes, I have deciphered that what looks like a capital T, is really her abbreviation for teaspoon)
Add:  1 1/8 c. sifted flour
1/4 teaspoon soda
1/2 teaspoon salt

Drop by spoonful
Bake 375 degrees, 10 minutes

If you notice on the right side of the recipe it says "over".  There is a small note on the back that says:
Sprinkle sugar before putting in oven

So, I am seriously thinking of trying these out, just because I want to see if they are cookies, or come out as something else.  If anyone in the family ever had Sugar Jumbles, please comment and let me know something about this recipe.

Sunday, August 18, 2013

Corn Dip

This recipe is from the drawer of Maxine.  As we near the beginning of football season, many of us begin to look to our stand by dip recipes... and then we begin to wonder if there are any "new" dip recipes we could try this year.  Well, I found one in Maxine's drawer.  So maybe this one will sound good enough for you to try, and see if you want to add it to your recipe standbys.


8 oz.  1 pkg. cream cheese
1 pkg. ranch dressing mix
1 can whole corn (drained)
1 can chopped black olives (drained)
Green or Red pepper (chopped)
Green chilies  4 oz  (chopped)

Serve - Lg. corn chips (scoops)

Well, I have to tell you, that I spent quite a bit of time having to decipher that first line.  I couldn't understand what "83" meant.  You know, this is one of the ways that recipes like this, that are hand-written, get changed and tweaked; sometimes it can be difficult to read the hand writing.  But I definitely think that the 8 oz makes since, especially since we are talking about cream cheese.

Another way that recipes get changed, is if the new cook doesn't particularly like one of the ingredients.  If I decide to make this dip, it will not have black olives in it.  So, it will be just a little different than Maxine's.  What we won't ever know, is if her version was maybe just a little different than the person she got it from.  Happy dipping!

Monday, August 12, 2013

Hummingbird Cake

This is from the recipe drawer of Maxine.  Hummingbird Cake...it is certainly a traditional, southern dessert.  This is my sister's favorite cake.  And since her birthday is this month, I thought this recipe would be appropriate. I remember my mom making this cake, but only on very special occasions.


3 cups flour
2 cups sugar
1 tsp. soda
1 tsp. salt
1 tsp. cinnamon
1 1/2 cups vegetable oil
3 eggs
1 1/2 tsp. vanilla
1 - 8 oz. can crushed pineapple
2 cups chopped bannana
1 cup nuts

1.  Sift dry ingredients together.
2.  Add all others
3.  Stir until mixed well - do not beat
4.  Bake in 10" tube pan 350 degree oven 1 hour 10 mins or until cooked.  Cool in pan.

Frosting

2 - 3 oz. cream cheese - softened
1 stick margarine
1 tsp. vanilla
1 box confectionery sugar

Since I knew that this was my sister's favorite cake, and I have actually made it for her a couple of times from a recipe my mom gave me, I thought I would look up her recipe and see if there was very much of a difference.  What I found was an almost identical recipe...the only differences were these:

*2 cups of nuts instead of 1
*Bake in 3 layer cake pans instead of a tube pan.  Bake for 25 to 30 minutes.
*Basically double the frosting recipe:  2 - 8 oz packages of cream cheese, 2 sticks of margarine, 2 tsp. vanilla and 2 boxes of confectionery sugar.  This will be enough to frost the three-layer cake.

By the way... I can highly recommend this cake, but be careful... it is very rich!

Monday, August 5, 2013

Mandarin Orange Cake

This is from the recipe drawer of Maxine.  This is one of those recipes that you imagine Maxine got from a friend at work.  How can we tell?  It is written on a notepad from Southwestern Bell Telephone Company where she worked for many years.  When someone brings a great dish to a work potluck, where do you write the recipe or have them write it for you?  More than likely in this day, they either send it to us in an email or by text.  Just another little detail that gets lost from the recipe.

1 box yellow cake mix
1 can Mandarin oranges w/juice
2 eggs
1/4 c. oil (in the second half of the 20th century, if it doesn't say, the oil is most likely vegetable oil)

Mix and pour in greased floured pan.
Bake 425 degrees 30 min. 9 x 13
Break up oranges; mixer or blender

1 sm. box instant vanilla pudding
1 sm. can pineapple w/juice
9 oz. carton Cool Whip (I don't think that you can buy a 9 oz Cool Whip; probably 8 oz)

Mix and spread.
Set in fridg (refrigerator) for 2 days
Optional - pecans on top

One thing I would always suggest when making a hand-written recipe is to read it all the way through before you begin.  You may find little notes, that give you better directions farther down in the recipe.  For example, it isn't until after we get the baking directions, that it tells us we need to break up the oranges with either a mixer or blender.  If we just started making it we would have whole orange segments in the batter.  Now I am not saying that the cake would not taste good... but it would be one of those occasions when you would have tweaked the recipe and it would start to be different...not wrong... just different.

Thursday, August 1, 2013

Old Time Bread Pudding

This is from the recipe drawer of Maxine.  There are so many versions of Bread Pudding and each cook probably changes the recipe just a little to create thousands of versions.  So this is the version I found in Maxine's drawer.  Notice that it was written on a "Shopping List" note pad.


4 slices buttered bread - toasted
1/2 c raisins
2 eggs, lightly beaten
1/2 c. sugar
1/8 tsp salt
1 c. evaporated milk
1 c. boiling water
1 tsp. vanilla
1/2 tsp. cinnamon

Cut bread into cubes & place in a greased 2-qt baking dish.
Sprinkle with raisins.
Mix eggs, 1/4 cup sugar, salt, milk & water
Pour over raisins
Let set 10 mins.
Add vanilla & stir
Sprinkle with remaining sugar & cinnamon
Bake 350 degrees 30 minutes

I really do love almost anything with raisins and cinnamon.  Maybe I had better give this one a try!

Monday, July 29, 2013

Cherry Crunch

This is from the recipe drawer of Maxine.  I think that it is such a treasure when you find personalized notes on some of these recipes we are digging through.  Comment at the end of this one:  Good, Cheap & Easy!  Can it get any better than that?

1 c. quick oats
1/2 c. flour
1 c. sugar
1/2 c. margarine
1 can cherry pie filling

Combine oats, sugar & flour.
Cut in margarine until crumbly.
Place half of the mixture in the bottom of an 8 x 8 x 2 pan.
Spoon in pie filling.
Spread remaining mixture on top.
Bake 45 min. at 350 degrees.
Good, Cheap, & Easy.

My mom also had a great dessert using canned cherry pie filling.  I think it was called Cherry Delight and had a whipped topping in there somewhere.  Maybe I will have to "dig through" her recipe drawer and see if I can find that one.  No need to work harder than we have to when we have great prepared ingredients to start with.

Friday, July 26, 2013

Goldie's Cole Slaw

This is from the recipe drawer of Maxine.  I'm not sure who Goldie was, but apparently Maxine liked her Cole Slaw enough to write it down and put it in her drawer.  If any of you do know who Goldie was, please let me know.

I have never been one to like Cole Slaw myself.  I just don't enjoy dishes with a substantial amount of mayonnaise.  But I do understand that this is a popular dish for picnics and BBQ's.  So if you like some crunchy Cole Slaw on the side at your summer shindig, give this recipe a try!


8 c cabbage -- shredded
1/8 t. garlic powder
2 T. sugar
1 t. salt
1/8 t. pepper
3/4 c. real mayonnaise

Mix together, let stand several hours or overnight.
(Just to be on the safe side, with this much mayonnaise, I would add... let stand in the refrigerator several hours or overnight.)

Thursday, July 18, 2013

Easy Hot Rolls

This is from the recipe drawer of Maxine.  Hot rolls are a staple at any southern holiday meal.  They are meant to be served hot out of the oven, hence the name.  These are different from biscuits as they are made with yeast and take much longer to prepare... so many times these would only be prepared and served on a holiday or very special occasion.


Into large bowl, put:
1/4 c sugar
1 1/2 t. shortening
1 t. salt
1 c. boiling water

In the meantime, soak:
1 yeast cake*
1/4 c lukewarm water
and let stand.

*Dry yeast may be used according to directions on package.

When the first mixture is tepid, add:
1 beaten egg

Sift:
4 c flour;  Add 2 c to the first mixture and then beat well.

Add the yeast mixture and beat for 3 minutes.
Then add the remaining 2 c flour  (The last cup will have to be kneaded in.)
Knead well and let rise in greased bowl for 1 1/2 hours.  (Cover dough with wax paper and a moist towel.)
When double in bulk, punch down, and make clover leaf rolls; (you make clover leaf rolls by pinching off small pieces of dough and rolling them into balls-put 3 into each space in the muffin tin) put in greased muffin tins, let rise about 1 hour
Bake in 425 degrees oven for about 10 minutes or until brown

These may be made the day before and put in the pan; just takes about 1/2 hour to rise when they are real cold.  (I assume this means that you would make them out and put in refrigerator.)
They freeze well after baking.
For leftovers they are delicious if split, buttered & toasted.

I don't ever remember eating these rolls at one of Maxine's dinners, but I have certainly eaten my share of many other versions at holiday dinners!

Monday, July 15, 2013

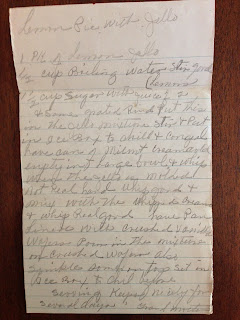
Lemon Pie with Jell-o

This is from the recipe drawer of Maxine.  I was so excited when I came across this recipe, mostly because it is interesting to find a recipe that is not in Maxine's handwriting.  It was on a folded piece of paper and on the folded side it read:  "Lemon Pie with Jello - For Maxine"


So I was curious the whole time I was reading through the recipe who might have written it.  At the very bottom of the recipe is written the word:  "Grandmother"   So we have it narrowed down to either her Grandmother Schlaefli or her Grandmother Bayles.  I am not sure which grandmother she received this recipe from, but if anyone reading this knows which great grandmother was famous for Lemon Pie, please let me know.  Either way...it is so exciting to have something handwritten by one of these great ladies.


1 pk of Lemon Jello
1/2 cup boiling water

Stir good.

1 1/2 cup sugar with juice of 2 lemons & some grated rind.

Put this in the Jello mixture.
Stir & put in ice box to chill & congeal.

Have can of Milnot cream cold.  (I remember my mom buying Milnot when she was going to make ice cream.  I think you can find this canned milk in the baking aisle at the grocery store.)

Empty in large bowl & whip
When the Jello is molded not real hard, whip good & mix with the whipped cream & whip real good

Have pan lined with:

Crushed vanilla wafers.

Pour in the mixture on crushed wafers.
Also sprinkle some on top.
Set in ice box to chill before serving.
Keeps nicely for several days.

Grandmother

I think that the combo of the fresh lemon juice and zest would greatly intensify the lemon flavor.  I'm sure this will be quite tart.  I am just wondering if it wouldn't be better to melt a little butter to mix with the vanilla wafers to make the crust.  You know...there is only one way to find out!

Fresh Strawberry Pie

This is from the recipe drawer of Maxine.  I love strawberry pie.  Used to be that you could only get strawberry pie during the month of May, in Oklahoma and Arkansas.  Now that we get huge, delicious strawberries for several months of the year, I think this would be a great refreshing dessert right in the heat of summer!

1 package (3 oz.) Jell-o Strawberry Gelatin
1 2/3 cups boiling water
2 cups (or one 4 1/2 oz container), thawed, Bird's Eye Cool Whip non-dairy whipped topping
2 tablespoons sugar
Red food coloring (optional)
1 baked 9-inch crumb crust; cooled
1 1/2 cups strawberry halves

Dissolve gelatin in boiling water.
Chill until slightly thickened.
Measure 1/2 cup & blend into Cool Whip with sugar.
Tint to desired shade with food coloring.
If necessary, chill Cool Whip mixture until firm enough to mound.
Spoon over bottom & up sides of crumb crust.
Stir strawberries into remaining thickened gelatin & gently spoon on top of the Cool Whip mixture.
Chill at least 3 hours.

This sounds so good... light and refreshing!  I'm not sure that I have ever seen a pie with the Cool Whip on the bottom.  Sounds like a great idea... more whipped topping!  I think that you could get away with a store bought graham cracker crust if you don't have a recipe for a homemade one, or if you just want to cut some corners.

Thursday, July 11, 2013

Squash Casserole

This is from the recipe drawer of Maxine.  If you happen to have a green thumb, you know how much squash a single plant can produce in the summer... what do you do with all that squash?  If not, a visit to the local Farmer's Market has you buying that beautiful squash, and still... what do you do with all that squash?  I found this recipe and it looks like it is the perfect side for any summer meal or a very satisfying vegetarian main dish.

The ingredients for this dish are just scattered throughout the recipe.  I thought I would make a list here for you, just so you could be sure and have all you needed before getting started.

1 stick melted oleo (this is another term for margarine)
1 pkg Pepperidge Farm dressing mix
2 lb. yellow squash
2 med. onions
salt
1 can cream of mushroom soup
1 c. chopped water chestnuts
1 small c(an) chopped pimentos  (I had a little trouble reading this line, but I think this is correct)
1 8 % carton sour cream (I believe that this was an abbreviation that meant 8 OUNCES)
1/2 lb. grated Longhorn cheese (Longhorn is a kind of colby cheese; could also use mild cheddar)

1 stick melted oleo mixed with 1 pkg Pepperidge Farm dressing mix
Salt & cook squash and onion - (it doesn't say, but I assume chopped) until tender.
Mix together can of cream of chicken soup, ...water chestnuts, ...pimentos, ...and sour cream.
Fold mixture into drained squash.
Layer half of dressing mix in casserole dish.
Add squash mixture.
Sprinkle 1/2 lb. grated Longhorn cheese.
Add other half of dressing.
Bake 325 degrees until hot (30 min).
Can be warmed if made day before.

This would be a great recipe to take along to a potluck or a picnic.  Also, for those members of your family who don't necessarily like their vegetables, how would they ever know, under all that sour cream and cheese!

Monday, July 8, 2013

Melt In Your Mouth Biscuits -- Yes!!...They Do!

So the end of last week I posted a biscuit recipe from the drawer of Maxine.  As I told you all at that time, biscuits have always been an issue for me and I am constantly looking for just the right recipe.  I think I may have found it.


Since this recipe called for only 2 ingredients, I just had to give a try:  biscuit mix and cream... how much easier could it get.


1 3/4 c. prepared biscuit mix
1 c. cream

At first I thought that it looked like too much liquid for the amount of mix, but I just decided to follow the recipe as written.  I used a fork to stir it together.  It was very sticky!


Next, knead a few times on a floured surface.  I tried be very gentle here... remember you want your biscuits light and tender.  The flour on the counter worked into the dough and it became a really nice consistency.


It said to roll out the dough, but I just patted it out.  Then I used a round biscuit cutter that I stole from my mom when I left home.  From the looks of it, I think she had probably done the same thing.  There was a little cream left in my measuring cup and I just really didn't want to waste it...so I brushed the tops of the biscuits with just a little bit of cream.

10 minutes at 450 degrees.  The timing was spot on.  I'm not sure if you can tell from the picture, but the biscuits actually split in the middle.  They were ready for my butter and homemade raspberry jam!  The only thing I think I will do differently the next time I make them...and I will make them again...is that I will roll them out just a little thicker and adjust the cooking time by a minute or two.  You have got to try these biscuits... their name does not disappoint!  Get the full recipe here.


Friday, July 5, 2013

Melt In Your Mouth Biscuits

This is from the recipe drawer of Maxine.  Is there anything more finicky than making biscuits?  This recipe that was in Maxine's drawer and with only 2 ingredients, looks pretty simple.  I, for one, can't wait to give it a try.

1 3/4 c. prepared biscuit mix
1 c. heavy whipping cream

Measure biscuit mix into mixing bowl.
Stir in cream lightly.
Gather into a ball.
Knead for several seconds on floured board.
Roll out 1 inch thick.
Cut with small cookie cutter.
Place on baking sheet.
Place in middle of oven.
Bake at 450 degrees; 10 minutes

Making biscuits has never been my forte.  As a matter of fact, through the first 20 years of my marriage, my husband often declared that he preferred "whop-um" biscuits (you know, the ones that you buy in a can and "whop um" on the counter to open) to the ones that I would make with my trusty biscuit mix.  It hurt my feelings at first, especially since I consider myself a pretty good cook.  Then came frozen biscuits and that became the standard in my house until just recently.

In the last couple of years, I have started trying several different biscuit recipes and lo and behold, my husband has liked them.  This recipe looks like it will be a hit... what made of cream isn't good??

Wednesday, July 3, 2013

Applesauce Cake

This is from the recipe drawer of Maxine.  Don't you love to see a recipe that looks like this... stained with ingredients and difficult to read... you know that this recipe has been made over and over... a winner for sure!
Maxine gave me this recipe several years ago and told me that it was her Grandma Schlaeffli's recipe.  I can tell that this is not Maxine's handwriting, so I am guessing that it may actually be written by Grandma Schlaeffli.  What a treasure!

1 1/2 cups applesauce
1 cup sugar
1/2 cup shortening
1 cup raisins
1 cup nuts
1 egg
1 teaspoon cinnamon
1/2 teaspoon allspice
1/2 teaspoon cloves
1/4 teaspoon nutmeg
2 cups flour
2 teaspoons soda, dissolved in a little hot water

Bake about 45 min. or more
375 degrees

So here lies the problem with many of these handwritten recipes from way back when.  There are no instructions.  So what we need to do is rely on our own knowledge of other recipes... mixing the wet ingredients, then the dry, and finally adding the dry to the wet.  This would be my first way to try this recipe.  But it may be one of those that you might have to make a couple of times and try out a couple of ways to see how it works best for you.

The other thing that I like to think about is the age of the recipe.  Maxine's Grandma Schlaeffli was probably making this recipe at the turn and in the first few decades of the 20th century. I would imagine her making this without the use of an electric mixer, so you might want to just try mixing this batter together in a bowl with a wooden spoon.  Along those same lines, she might have used whatever nuts she had available, so you could try it with pecans one time, walnuts another time, etc.  See which you like better.  I'm sure that this is the way we ended up with untold numbers of different recipes for the same items... everyone doing just one little trick different to make it their own.  Maybe some day it won't be Grandma Schlaeffli's Applesauce Cake...  your granddaughter may call it Grandma (insert your name here) Applesauce Cake.  No greater tribute of respect than having food named after you!

Tuesday, June 25, 2013

Pecan Pie

This is from the recipe drawer of Maxine.  Well, anyone who knows Maxine, knows that Pecan Pie is her "specialty"!  I, for one, have adopted this recipe as my own.  I always get great compliments on my Pecan Pie.

As far as pies go, many think that Pecan Pie is something very difficult to make.  But as you can see from this recipe, it is fairly simple.  There isn't a recipe here for the pie crust, so use your favorite, or even buy one in the refrigerated section of the grocery store.  Give it a crimp around the edges and no one will ever know that you didn't whip it up yourself!

3 eggs
1 cup sugar
1 stick butter or oleo (oleo is an older term for margarine)
1 cup Kero syrup - light or dark ( I think that it is actually spelled Karo)
1 cup whole pecans (I don't believe that you can actually buy "whole" pecans, I interpret this to mean halves, not chopped pecans or pecan pieces)

1) Beat eggs and sugar.
2) Cut in soft butter.
3) Add syrup, beat well.
4) Add pecans and mix well.
5) Pour into unbaked pastry (pie) shell.
6) Bake 50-60 minutes in 375 degree oven.

Four Bean Salad

This is from the recipe drawer of Maxine.  She is my husband's aunt.  I found this recipe on a card in her handwriting:
This is a classic southern salad, often found at church potluck dinners and picnics.  I'm not sure that I ever had any of Aunt Maxine's Four Bean Salad, but if you did, let us know what you liked about it.  The recipe is simple and uncomplicated, perfect for a beginning cook.

1 can of green beans
1 can of yellow wax beans
1 can of kidney beans
1 can of garbanzo beans

1)  Drain and wash all beans.

1 large Bermuda onion
1 green pepper
1 bunch of celery

2)  Chop vegetables and mix with beans.
3)  Cover with a mixture of:

3/4 cup sugar
1/2 cup vinegar
1/2 cup salad oil  (this is the same as vegetable oil)
1 teaspoon salt
pepper to taste

4) Let stand for a day before serving.  Keeps well in refrigerator.